
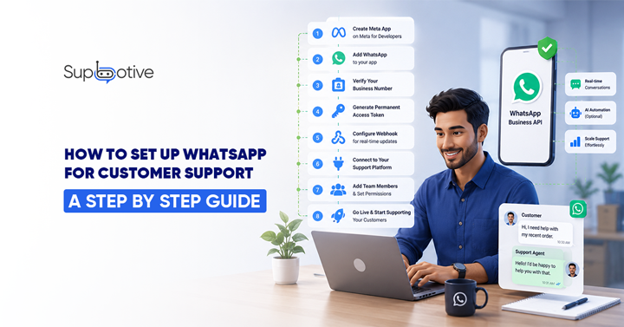
WhatsApp Business App vs WhatsApp Business API Know This First
Before touching any settings, understand which product you actually need.
The WhatsApp Business App is free and works for very small operations solo traders or micro businesses with one device and one user. It supports basic automated replies. It does not support multiple agents, automation at scale, or integration with customer support platforms. The Business App is a dead end: max 5 devices, no real automation .
The WhatsApp Business API (specifically the Cloud API in 2026) is what growing businesses need. It supports multiple agents, AI chatbot integration, knowledge base training, smart escalation, and up to 1,000 messages per second. Setup takes under 15 minutes and requires no server maintenance Meta hosts it .
This guide covers the API setup. If you are managing more than 50 customer messages per week, the API is the right choice.
What You Need Before You Start
-
- A Facebook Business Manager account (free business.facebook.com)
- A phone number not currently registered on any WhatsApp account or one you are willing to migrate
- Business verification documents company registration or trade license
- A Meta developer account (free developers.facebook.com)
- Your support platform credentials – in this case, Supbotive
One important note on phone numbers: after migration to the API, the number no longer works in the regular WhatsApp app or Business App. Many businesses use a dedicated number specifically for the API channel.

Step 1: Go to Meta for Developers
Open developers.facebook.com and log in with your Facebook account.
If you do not have a developer account yet, click “Get Started” and follow the registration flow. It takes two minutes. You will need to accept Meta’s developer terms before proceeding.
Make sure the account is linked to your Meta Business Manager the central hub where your WhatsApp Business Account (WABA) will live.
Step 2: Create a Meta App
Once inside the developer dashboard, click “Create App”.
Select “Business” as your app type when prompted. Give your app a name something clear like “YourBusiness Support” and select your Business Manager account from the dropdown.
Click “Create App”. Meta will ask you to re enter your Facebook password to confirm.
You now have a Meta app the container that will hold your WhatsApp integration.
Step 3: Add WhatsApp to the App
Inside your new app dashboard, scroll through the list of products until you see WhatsApp. Click “Set Up”.
Meta will prompt you to connect to a WhatsApp Business Account (WABA). Either create a new one or link an existing one if you already have a verified business on Meta.
You may also be asked to accept WhatsApp’s Business Terms at this stage. Read and accept them to proceed.
Once WhatsApp is added, a WhatsApp settings section appears in the left sidebar of the developer portal this is where the rest of the setup happens.
Step 4: Verify Your Business Phone Number
In the WhatsApp settings section, navigate to “Phone Numbers” and click “Add Phone Number”.
Enter the number you want to use for customer support. Meta will verify it via a call or SMS code choose whichever works for your number type.
After verification, your number is registered as a WhatsApp Business API number. It will no longer work as a regular WhatsApp or WhatsApp Business App number from this point.
Your display name the name customers see when you message them must match your verified company name. Meta allows some variation, such as adding a department name: “MyCompany Support”.
Note: Meta also provides a free test phone number for sandbox testing before using your real number. This is useful for the testing step later in this guide.
Step 5: Generate a Permanent Token
A temporary access token is generated automatically in the dashboard but it expires every 24 hours. For a live customer support setup, you need a permanent token.
To generate one:
-
- Go to Meta Business Manager → System Users
- Create a System User with Admin access
- Assign your app to that System User
- Click “Generate New Token” and select your app
- Tick the permissions: whatsapp_business_messaging and whatsapp_business_management
- Copy and store the token securely you will paste it into Supbotive in Step 7 Do not share this token publicly. It authorises full messaging access on your WhatsApp number.
Step 6: Configure the Webhook
A webhook is the URL that receives real time notifications from Meta when a customer sends a message. Without it, your support platform never knows a message arrived.
In your app dashboard, go to WhatsApp → Configuration → Webhook.
Click “Edit” and enter:
-
- Callback URL this is provided by Supbotive in your account settings
- Verify Token a string you create yourself (any random phrase)
Click “Verify and Save”. Meta sends a verification request to the callback URL. If Supbotive receives it correctly, the webhook is confirmed.
Under “Webhook Fields”, subscribe to messages this ensures every incoming customer message triggers a notification to your platform.
Step 7: Paste Your Credentials Into Supbotive
You now have three pieces of information from the Meta dashboard:
-
- Permanent Access Token from Step 5
- Phone Number ID found in WhatsApp → Phone Numbers in the dashboard
- WhatsApp Business Account ID found in your Meta Business Manager settings
Open your Supbotive account, navigate to the WhatsApp integration settings, and paste all three values into the corresponding fields.
Save the configuration. Supbotive connects to your WhatsApp Business API immediately. Your knowledge base is now the source of truth for every customer query that arrives on this number.
Step 8: Test Messaging
Before going live with real customers, send test messages to confirm everything works end to end.
Using Meta’s test phone number or your own personal WhatsApp number as the recipient:
- Send a message to your business number
- Confirm it appears in your Supbotive dashboard
- Confirm the chatbot reads the intent and searches the knowledge base
- Confirm the bot delivers a response in the WhatsApp thread
- Test an escalation trigger send a message that falls outside the knowledge base and confirm the alert fires to your agent
If the test number receives a response within seconds, your setup is complete. Service messages replies to customers who message you first cost nothing within the 24-hour customer service window.
FAQs
Do I need a developer to set up WhatsApp for customer support?
Can I use my existing WhatsApp number for the Business API?
How long does WhatsApp Business API setup take?
Is WhatsApp customer support GDPR compliant for UK businesses?
Ready to connect WhatsApp to your customer support system? Book a live demo with Supbotive and we will walk you through every step from Meta credentials to your first live customer conversation.